Quick answer: To reduce image file size, compress the image to a target size first. If the result is still too big or looks soft, shrink its pixel dimensions, save photos as JPG or WebP instead of PNG, and crop away anything you don’t need. Done in the right order, these steps can take a phone photo from several megabytes down to a few hundred kilobytes with no difference you can see on screen.
In this guide
Big image files cause small, annoying problems: an upload form that rejects your photo, an email that bounces, a web page that takes forever to load. The good news is that almost every image is far larger than it needs to be, and you can fix that in a minute without installing anything.
This guide explains what actually makes an image file large, the five ways to make it smaller, the order to apply them in, and how small your file should be for common uses. Each section links to a more detailed guide if you want to go deeper.
What makes an image file large?
Four things decide how many kilobytes an image takes up:
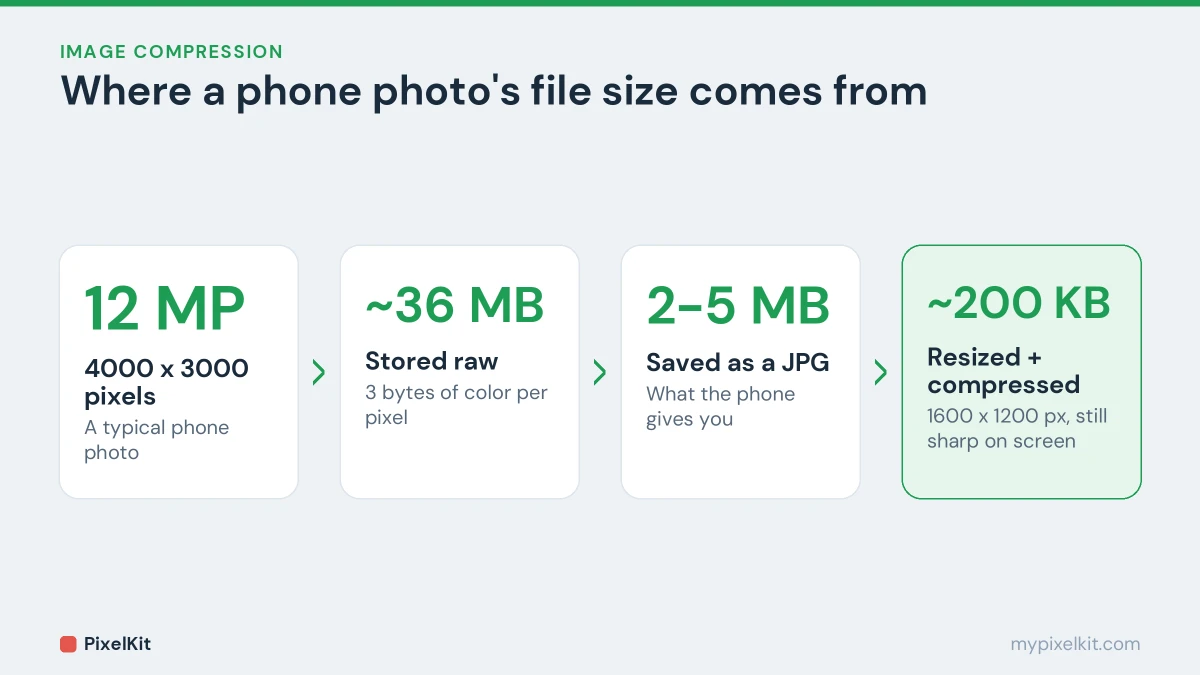
- Pixel dimensions. A typical 12-megapixel phone photo is about 4000 × 3000 pixels, or 12 million pixels. Stored raw, with three bytes of color per pixel, that would be around 36 MB. Compression is the only reason it ends up as a 2–5 MB file.
- File format. JPG and WebP use lossy compression, which is very efficient for photos. PNG is lossless, which is perfect for screenshots and logos but makes photos several times larger.
- Compression level. Lossy formats let you trade quality for size. The same photo saved at high quality can be three or four times larger than at medium quality, with little visible difference.
- Detail and noise. A photo of a clear blue sky compresses far better than a photo of gravel, leaves or a grainy low-light scene, simply because there is less detail to describe.
Hidden metadata, such as camera settings, the GPS location and an embedded preview, adds a little on top, usually a few kilobytes to a few dozen.
Once you know that, the ways to shrink a file follow naturally: fewer pixels, a better format, stronger compression, less content and less metadata.
Method 1: Compress the image
Compression is the quickest win because the image stays exactly the same size on screen. A compressor re-encodes the picture and throws away detail your eyes are unlikely to notice, such as tiny color variations inside a patch of sky.
The easiest way to control the result is to compress to a target size instead of guessing a quality number. In PixelKit’s Compress Image tool you set the limit you need, for example 200 KB, and the image is re-encoded to land at or under it. Everything runs in your browser, so the photo is never uploaded anywhere.
How far you can push compression depends on the image’s dimensions. A large photo squeezed into a tiny file will look blurry and blocky, which is where the next method comes in. If you need to hit a specific number, our step-by-step guide on how to compress an image to 50KB shows how to get there cleanly.
Method 2: Reduce the pixel dimensions
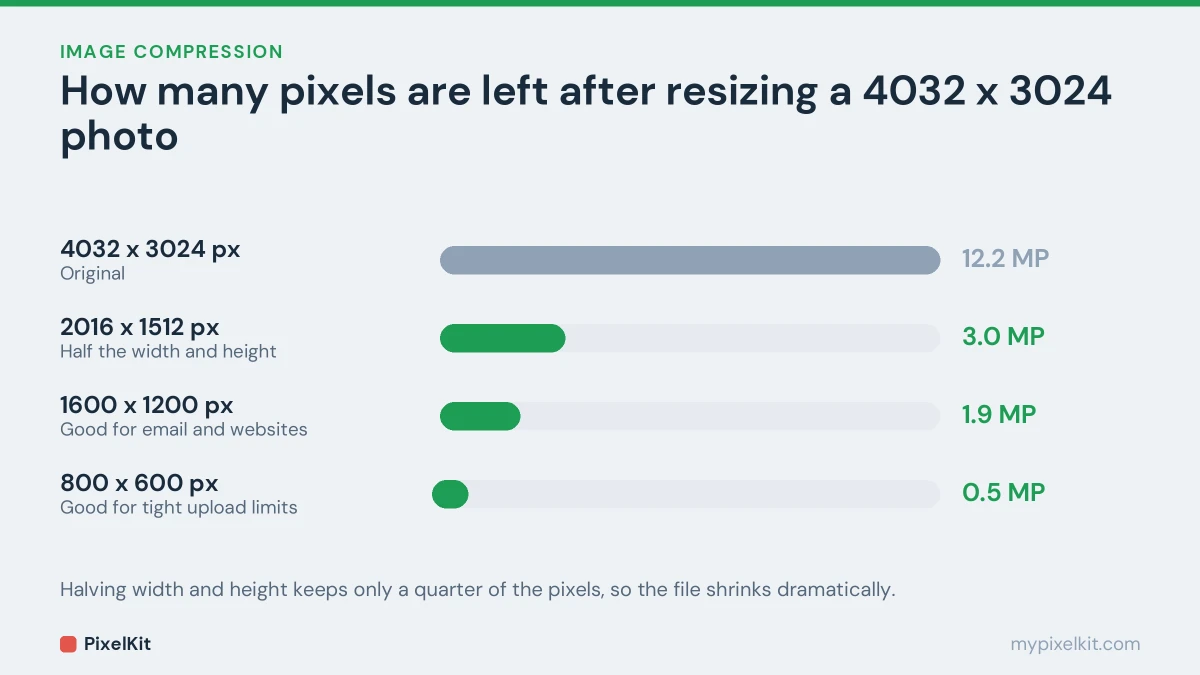
File size grows with the number of pixels, so resizing is the most powerful lever you have. Halving the width and the height leaves only a quarter of the pixels. Shrinking a 4032 × 3024 phone photo to 1600 × 1200 keeps about one sixth of them.
Most uses never need the full resolution of a modern camera:
- A full-width image on a website rarely needs to be wider than 1600–2000 pixels.
- A photo attached to an email or sent in a chat looks fine at 1200–1600 pixels on the long side.
- Profile pictures and thumbnails are usually displayed at a few hundred pixels.
Use Resize Image to set an exact width and height, or to scale by percent. Keep the proportions locked so the picture doesn’t stretch; our guide on resizing an image without losing quality covers the rules. One rule to remember: resizing only helps in one direction. Making a small image bigger adds pixels but no detail, so the file grows while the picture gets softer.
Method 3: Use the right file format
The wrong format is one of the most common causes of oversized files. As a rule of thumb:
- JPG for photographs. It works everywhere and produces small files for natural images.
- PNG for screenshots, logos, text and anything with transparency. It keeps sharp edges perfectly, but a photo saved as PNG is often several times larger than the same photo as a JPG.
- WebP for the web. Google reports that lossy WebP files are roughly 25–34% smaller than comparable JPGs, and every current browser can display them.
- HEIC is what iPhones save by default. It is efficient, but many websites and Windows apps can’t open it, so convert it with Convert to JPG when a form refuses it. Our guide to converting HEIC to JPG covers every option.
To switch between JPG, PNG and WebP, use Convert Image; if you are unsure which one fits, see JPG vs PNG vs WebP. If you want to understand why JPG shrinks photos so well while PNG keeps screenshots crisp, read lossy vs lossless compression explained.
Method 4: Crop what you don’t need
Every pixel you crop away is a pixel you don’t have to store. A scanned receipt surrounded by tabletop, a portrait with a wide empty background, or a screenshot of the whole screen when you only need one window are all easy wins. Crop Image lets you drag a box around the part you want to keep. Cropping usually makes the image clearer to whoever looks at it, too.
Method 5: Remove hidden metadata
Photos from phones and cameras carry EXIF metadata: the camera model, exposure settings, the date, often a small preview image and sometimes the exact GPS location where the photo was taken. It rarely makes up a large share of the file, but it is worth removing for privacy before you share a photo publicly.
Tools that redraw the image in your browser, such as PixelKit’s, write a brand-new file and generally don’t carry the original camera metadata across. If the location of a photo matters to you, check the result in your device’s file information panel before you post it.
The right order: crop, resize, convert, compress
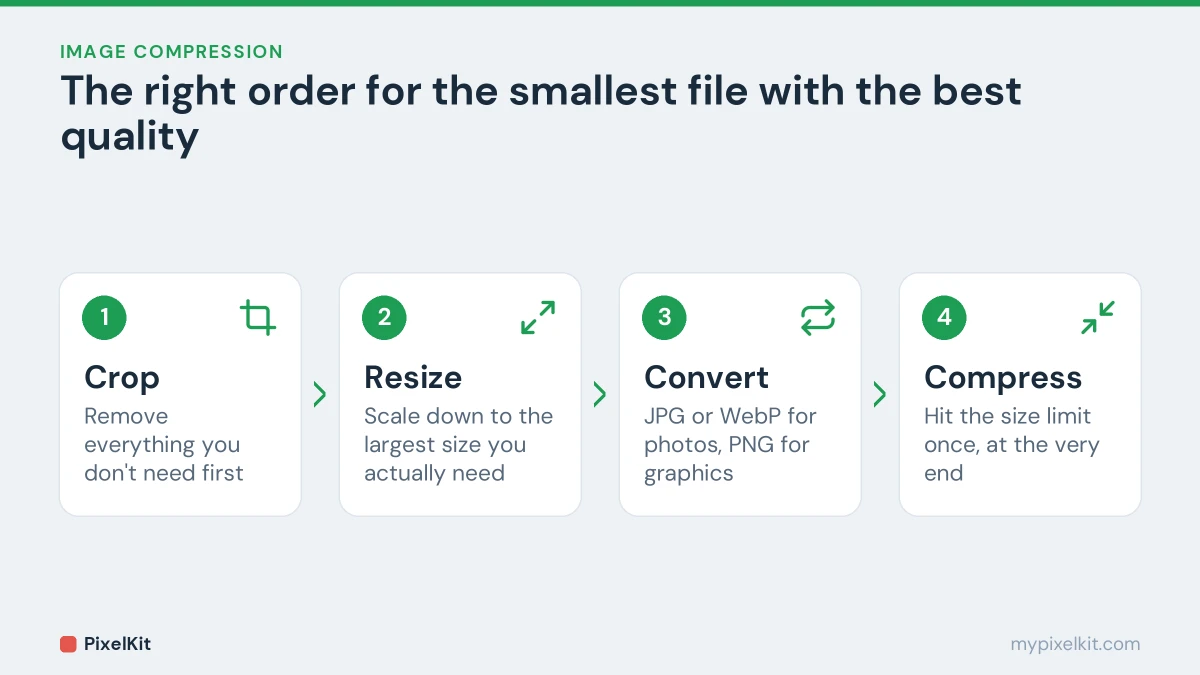
When you need a file to be as small as possible while still looking good, the order of the steps matters:
- Crop first, so you don’t spend any file size on parts you will throw away.
- Resize to the largest dimensions you actually need.
- Convert to the right format, for example a PNG photo to JPG, or a JPG to WebP for a website.
- Compress last, to land exactly on your size limit.
Compressing last matters because lossy compression damage adds up. Every time a JPG is opened, edited and saved again, it loses a little more quality. Always start from the original file and compress once, at the end.
How small should your image be?
There is no single right size; it depends on where the image is going. These are sensible targets for common situations:
| Where the image is going | Suggested dimensions | Suggested file size |
|---|---|---|
| Online application or government form | Whatever the form specifies | At or just under the stated limit (often 50 KB to 2 MB) |
| Email attachment | 1200–1600 px on the long side | 200–500 KB per photo |
| Full-width website image | 1600–2000 px wide | Under about 200–300 KB |
| Image inside a blog post | 800–1200 px wide | Under about 100–150 KB |
| Profile picture or thumbnail | 400–800 px square | Under about 50–100 KB |
Email services cap the total size of attachments, for example 25 MB in Gmail and 20 MB in Outlook.com, so a handful of full-size phone photos can hit the limit fast. Websites are stricter still: images are usually the heaviest part of a page, and our guide to optimizing images for a faster website covers exactly how to handle them.
Common mistakes that keep files large or ruin quality
- Changing the DPI instead of the pixels. DPI (or PPI) is only a note that tells a printer how large to print the image. Changing it from 300 to 72 doesn’t remove a single pixel, so the file size barely changes. Our guide to pixels, DPI and aspect ratio explains why.
- Compressing the same file again and again. Each round of lossy compression adds artifacts. Go back to the original instead.
- Saving photos as PNG. PNG keeps every pixel exactly, which is wasted on a photo and makes the file much bigger.
- Squeezing a huge image into a tiny limit. A 12-megapixel photo forced into 50 KB will look terrible. Resize it first, then compress.
- Upscaling a small image. Enlarging adds pixels without adding detail, so the file grows and the picture blurs.
If a website keeps refusing your picture even after you have made it smaller, the problem may not be the file size at all. See why photo uploads get rejected and how to fix each cause for the other usual suspects.
Reduce image file size: the short version
To reduce image file size quickly, work in this order: crop away what you do not need, resize to the dimensions you will actually display, pick the right format, then compress to a target. Each step lowers the image file size on its own, and together they can take a multi-megabyte photo down to a few hundred kilobytes. If you only have a strict file size limit to meet, go straight to Compress Image. The same routine will reduce image file size for websites, email and upload forms alike.
Frequently asked questions
Does reducing file size always reduce quality?
Resizing and lossy compression both remove information, but at sensible settings the difference is invisible on a screen. Cropping, removing metadata and converting a PNG photo to a good-quality JPG cost nothing you would notice.
Can I reduce image size on my phone?
Yes. PixelKit works in any modern mobile browser on iPhone and Android, with no app to install. Open Compress Image, pick the photo from your gallery and download the smaller version.
Why is my compressed image still too big?
Most likely its pixel dimensions are too large for the target. Resize it to fewer pixels and compress again. If it is a photo saved as PNG, convert it to JPG first.
Is it safe to compress private photos online?
That depends on the tool. Many online compressors upload your file to their server to process it. PixelKit does the work inside your browser, so your photos never leave your device.
Sources and further reading
- WebP compression study (Google for Developers): Google's study comparing WebP file sizes with JPEG at similar quality.
- Send attachments with your Gmail message (Gmail Help): Gmail's attachment size limit and how larger files are handled.
- Exif (Wikipedia): How camera metadata, including orientation and GPS location, is stored in photos.
- Dots per inch (Wikipedia): What DPI means in printing and why it is not the same as pixel dimensions.